In this series, we are covering things to consider before using a water jetter. If you haven’t read part one, you can find it here.
Check your water supply before you start
Since high-pressure water is the tool that is doing the work down the drain, it makes sense to make sure that you have enough of it! If you happen to be using a large jetter with a holding tank, for example, a trailer jetter, your only challenge is to make sure that the tank doesn’t run dry! Most of these units have an automatic shut-off that keeps you from making this mistake. However, if you are using a jet that draws water from a garden hose, a little more attention is required.
Most municipal and well water systems in North America will deliver approximately five to six gallons a minute of flow, but we recommend that you make no assumptions!
Just get a two-gallon bucket and measure how much time it takes to fill. If you’re close, don’t take the chance, because you could accidentally starve the pump of water and cause cavitation. Since cavitation is the second most popular way to kill your pump, pay attention to details!
Pro Tip: If your water supply is borderline (which means that the available water flow is close to the minimum required for your jetter to operate properly), use a larger supply hose or a buffer tank to ensure consistent flow. Paying attention to water pressure can prolong your pump’s life and improve jetting efficiency! Most pumps need a minimum of 30 psi, with maximum of 100 psi.
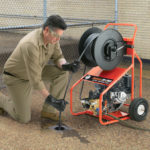
Keep your hose moving
The preferred technique for jetting a line is to work the hose back and forth.
- Use a Back-and-Forth Motion
- Push the hose two feet forward into the pipe.
- Pull it one foot back to allow the water jets to clean effectively.
- Repeat this process—push forward two feet, pull back one foot—until the entire line is cleaned.
- Focus on the Retraction for Maximum Cleaning
- The most effective cleaning happens when pulling the hose back, not when pushing it in.
- As you retract the hose, the water jets are angled to scour the sides of the pipe, removing grease, sludge, and debris more efficiently.
- Keep the Hose Moving
- Maintain a steady back-and-forth motion to ensure thorough cleaning.
- A moving hose cleans faster and more effectively than one that’s stationary.
By using this technique, you’ll get better results in less time while keeping the pipe as clean as possible!
Plus, there’s another reason to keep the jetter hose moving. Because of the fluid dynamics of high-pressure water flow, turbulence can cause vortices to form just behind the nozzle when you’re doing a job.
These vortices, if stationary for any length of time, can suck sand, loose dirt, grease or sludge in behind the nozzle, causing a plug that can trap your jetter hose down the pipe. Getting your hose caught in the sewer pipe, no matter what the cause, is a bad thing. Unlike a snake that gets caught in the drain, you can’t just hook it to your bumper and pull it out. Digging is usually the only viable option.
Use the right nozzles and keep your nozzles clean
High pressure water jetters are designed with precision jetter nozzles that must match the pump output for maximum efficiency. If the holes in the nozzles (orifice size) is too big, the pressure will be below spec. If your pressure is dropping, check the nozzles and replace if worn. If the orifice size is too small, or if the nozzle is clogged with debris, the pressure will spike and could damage the pump. You can clean clogged nozzles with a welding tip cleaner, or replace a clogged nozzle with a new one. Remember, the nozzles must match the pump specs or your jetter performance will suffer and you could damage the machine.
Don’t freeze up
Statistically, freezing is the number two way to kill your pump! (Running the pump dry is number one.)
Obviously, you are exempt from this warning if you live in a warm-weather climate. However, if you live in a place that goes through four seasons, you’ll find that it is surprisingly difficult to keep your pump from freezing when you are doing work on a frigid day. The damage can take place before, during and after the job and can affect your hose as well as your pump.
How to Prevent Your Jetter Pump from Freezing
To keep your water jetter pump from freezing in cold temperatures, follow these steps:
- Use the Built-in Antifreeze Tank (If Available)
- If your jetter has an antifreeze tank, like General’s Typhoon Trailer Jetter, use it whenever temperatures approach freezing.
- Manually Introduce Antifreeze (If No Built-in Tank)
If your unit lacks an antifreeze system, you’ll need to add antifreeze manually:
- Get a short hose and a funnel.
- Disconnect the hose running from the output valve to the hose reel swivel.
- Pour antifreeze into the inlet while starting the motor.
- Keep running the motor until you see antifreeze exiting from the output valve.
- Shut off the motor once antifreeze has circulated through the system.
- Clear Water from the Hose
- Remove the nozzle from the hose.
- Use an air compressor to blow out any remaining water.
- Do this before driving to the job site and again before heading home.
- Prevent Freezing During the Job
- Minimize the time your unit sits idle without water flowing.
- Periodically turn the unit on and run water through the bypass system to keep it warm.
- Assign someone to monitor the pump and ensure it stays operational.
You probably noticed that most of the points above can be summarized by “pay attention to what you’re doing” and “do your homework.” Plumbing water jetters are fantastic tools for the plumbing professionals in our industry and can address most sewage problems better than other tools at our disposal.
Contact the Drain Brain® Team at General at 800-245-6200 or by email [email protected].